
Blackout Comms Mesh Cloud
Bridge any gap in your private mesh cluster with Blackout Comms Mesh Cloud. When you enable WiFi & Cloud on a pair of your devices, a bridge between those two devices automatically forms. That bridge automatically becomes usable to your other devices.

-
Blackout Comms Mesh Cloud is free to try for 14 days
-
After that, $5/month (cancel any time) for up to 3 cloud connections
If you want long-distance connectivity without our cloud (and are tech-savvy), you can run Blackout Comms over MQTT, by setting it up and hosting it yourself or elsewhere.
Blackout Comms Mesh Cloud is an optional service that requires a paid subscription (you can try it free for 14 days).
For local communication (distance varies), Blackout Comms does not use internet or any service. But, for bridging very long distances, the Blackout Comms Mesh Cloud is an option.
Device positions are carried across the bridge
Messages & broadcasts are carried across the bridge
End-to-end encryption and digital signatures are always in place. Messages and locations can only be decrypted by your trusted devices.
If internet becomes unavailable (or you leave WiFi range), messages are held by cloud-connected devices for up to 24 hours, and sent once internet is back.
All devices, including cloud-connected, continue to use local LoRa at all times, using cloud only as necessary
Activating Cloud on a Device
Choose two or three devices in your private cluster that will be cloud-connected (automatically forming a bridge between them)


Cloud-Connect any Communicator(s)
up to your subscription limit
-
Blackout Comms communicators require 2.4G WiFi and do not yet support hidden SSIDs.
-
If you're connection keeps getting dropped, it's possible your router is not supported. If that happens, this is one (of many) routers that work
-
WiFi passwords are currently limited with regard to special characters.
-
The chosen device(s) do not have to be ones you carry around. A cloud-connected device left in your house can still be an effective bridge
1. Add Wi-Fi Connection(s)
Choose Settings / WiFi / Add Network

Add up to 5 connections
2. Open Cloud Settings
Choose Settings / Mesh Cloud / Cloud Setup
On a touchscreen, touch the cloud
3. Scan QR Code & Enable Cloud
Scan the QR code with a mobile phone.

Don't forget to click Enable Cloud!
You should now be cloud-connected!
Now your device is communicating with your cluster locally as usual via LoRa, but also available as a bridge to any of your other cloud-connected devices.
A blue cloud means you have a good connection.
A red WiFi symbol means there is not a live WiFi connection.
Your Cloud Free Trial is now active for the next 14 days.
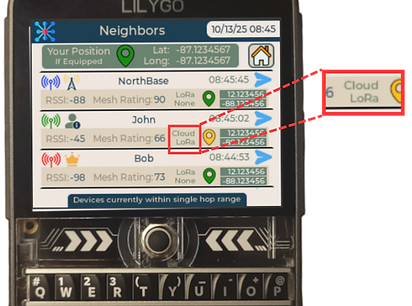
If you have more than one device cloud-connected, check the Neighbor's screen of either device to see if the bridge is open.
If so, you'll see a cloud-based connection between the two devices.
When Your Subscription Expires
If a cloud-enabled device has a subscription that expires, it will automatically prompt you with a QR code.
At that point, you can either disable cloud or scan the code and purchase a subscription.

